


Help
How can we help?
BIMsmith Forge® makes it easy to create entire Revit walls layer-by-layer using BIM data. Once in Revit, here is how you can tag each layer of a Revit assembly for your construction documents.
To begin, download the “Wall Tag” and “Material Tag” from BIMsmith Market. This will allow the different tags described below to access the standard parameters in both the system family and the materials embedded in the wall family. All families have standard parameters that come “out-of-the-box” with Revit, and it is recommended to use only those parameters to control the display of the information for simplicity's sake.
Tagging a wall (or any System Family) can be done in one of two ways. Either you are pulling data from the entire assembly (wall in this example) using a “Wall Tag”, or you can tag the individual materials in each layer of the assembly by using a “Material Tag”. Both tag options serve unique purposes, so let’s start to understand which might be helpful for you.
Wall Tags
Regardless if you are submitting a set of CDs for Permit or communicating some DD concepts to a client, showing the reviewer your intentions is critical. When looking at an assembly as a whole, there is information that needs to be conveyed that only applies to that specific combination of products and installation instructions. For example, when proving a particular wall in a Permit Set meets a minimum UL or Fire Rating criteria it is critical that the assembly is clearly broken out so the reviewer can confirm what the drawing calls out.
In Revit, that means building your system family with the appropriate products, thicknesses, and assembly order. It is also critical to keep each wall type organized so the drawing set can be easily consumed and understood. This is often done by a “Wall Type Schedule”. This schedule needs to not only tag the wall with a number/letter system but also clarify how the wall is to perform in the built environment. This information is stored in the metadata of the Wall itself. Four different examples of a Wall Tag are shown below, all using standard parameters that BIMsmith uses across the platform for consistency:

• BIMsmith organizes all system families in a similar fashion so different tags can pull out different types and amounts of information. For example, the top tag is displaying only the Wall Type name (W-1) which would reference a schedule clarifying how W-1 is intended to be put together.
• The second tag from the top is showing the same Wall Type, however, it is also indicating the Fire Rating and R-Value of the wall. Depending on the municipality or reviewing entity, this may be all you are required to show.
• Third on the list is a Manufacturer list which is helping the General Contractor understand which manufacturer you are requesting compared the 3 part specifications in the construction documents.
• Finally, the last tag example shows a more robust offering of the Wall Type, Fire Rating, and R-value, as well as the specific products and thicknesses of each layer.
Material Tags
When drilling into a more detailed level of information, Material Tags provide a look at each individual layer, allowing the user to call out a specific material with both a leader/arrow and the information within that material. BIMsmith Material tags allow users to express this information with different levels of detail (LOD) to suit your drawing's needs. There are three LOD material types shown below, all pulling from standard material parameters and all found consistently throughout the BIMsmith website:
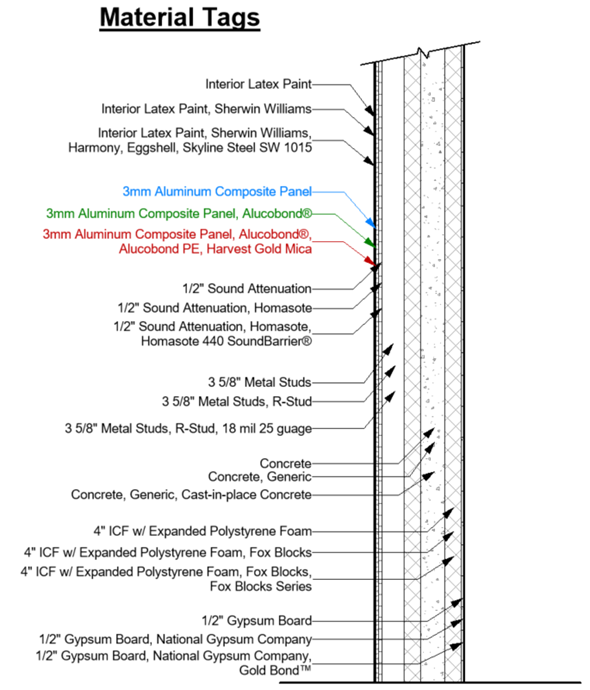
The above example shows three levels of LOD for each material for example purposes only, typically as a set of drawings progresses from SD to CD that level of detail will continue to get more developed. This can be accomplished using the same system family and materials but switching the Material Tag types from LOD 100 (shown in blue above), to LOD 200 (shown in green above), and finally LOD 300-500 (shown in red above).
• The Top tag for each material (LOD 100) is displaying only the basic description of the material and will keep the information general.
• The second tag type (LOD 200) will show the basic description as well as the manufacturer.
• The third and bottom-most tag type (LOD 300-500) shows the basic description, manufacturer, and specific product (often down to the color or model number)
These tags are designed for Revit users to maintain the same system family throughout the lifecycle of the Revit file, but as the information becomes more developed in the walls, roofs, floors, and ceilings, the tags can be dynamic enough to capture any level of information for your drawings.
Featured Brands: